Quickly Booked App Support
To ensure that your Quickly Booked App appointments do not conflict with your personal schedule in Apple Calendar, you can sync your working hours. This integration will update your Apple Calendar with all of your Quickly Booked App appointments, marking those times as busy. As a result, Quickly Booked App will not accept reservations during these busy times on your Apple Calendar.
Important Notes:
- The Apple Calendar app (iCal), which you may be familiar with on your MacBook or Phone, is not a calendar itself; it functions as a calendar viewer. Because iCal/Apple Calendar serves as a display interface, direct integration with Quickly Booked App is not feasible. For instance, if your primary calendar is a Google calendar but you access it through your iCal app, you should connect your Google calendar instead. For additional information, please see below.
- During the setup, we recommend opening two tabs in your browser:Settings/Features & Integrations/Integrations -> Apple CalendarThe page of your Apple account
- Settings/Features & Integrations/Integrations -> Apple Calendar
- The page of your Apple account
- It is not yet possible to achieve full 2-way synchronization, so if you reschedule or delete an event in your Apple calendar it will not be updated in Quickly Booked App.
The Apple Calendar integration for Quickly Booked App is considered a premium integration, and it will be counted towards your total number of Custom Features & Integrations.
Configure the App-Specific Password in your Apple account
Before enabling Apple Calendar in Quickly Booked App, your Apple account needs to have the 2FA (2-Factor Authentication) configured, and an App-Specific Password created.
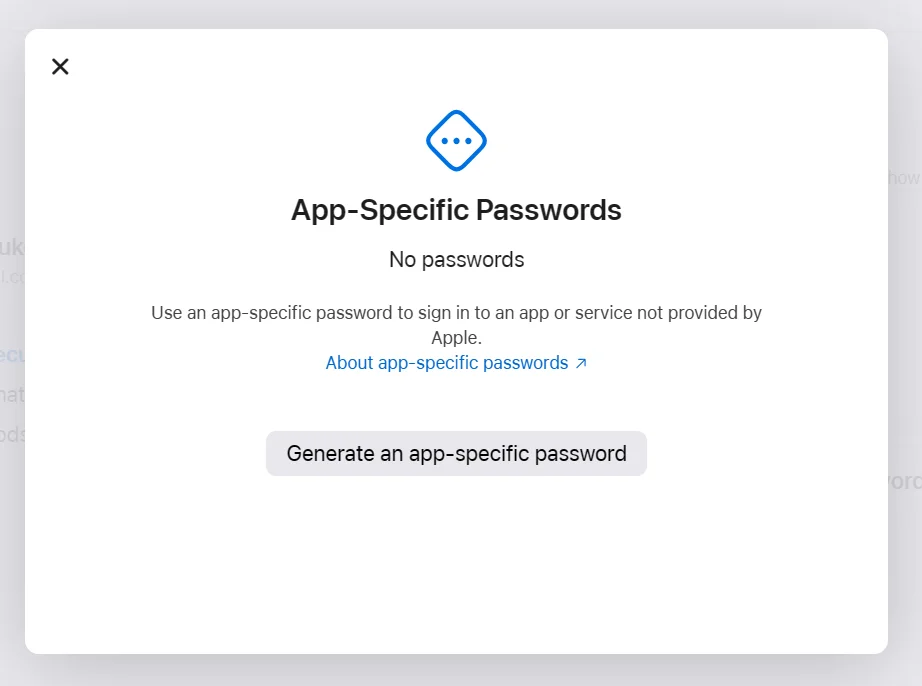
First, log in to appleid.apple.com. Under Account Security, you need to turn on two-factor authentication (if you haven’t done so already). Once that’s done, click on “App-Specific Passwords” and click on Generate Password:

You’ll see a popup where you’ll need to click on “Generate an app-specific password“:
The name of the password can be whatever you want it to be, so on the next screen, define the name (for example “Quickly Booked App”) and click on “Create”:
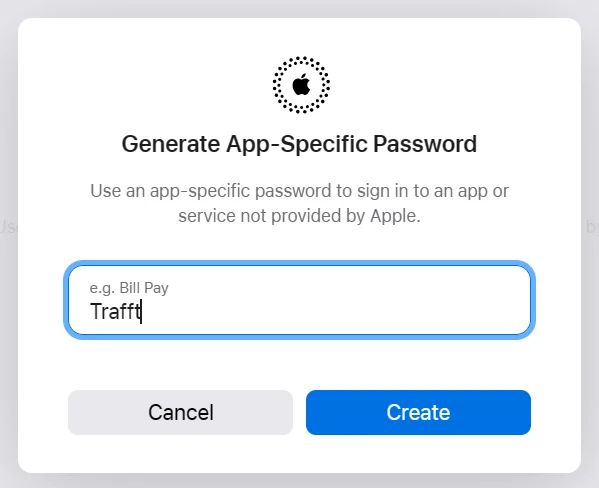
You may be prompted to enter your AppleID password to confirm your identity. Once you do that, you will see a password in this format:
xxxx-xxxx-xxxx-xxxx
Copy this password (with hyphens (-) included) and save it somewhere safe. You won’t be able to see this password after you close the popup so it is important to save it. After this, you’ll be able to link your Apple Calendar with Quickly Booked App.
Also, if you revoke the app-specific password in the meantime, you will automatically be logged out of the Apple Calendar in Quickly Booked App and you will need to configure a new app-specific password and repeat the process in order to continue using this integration with Quickly Booked App.
Please Note:
A few Apple users have encountered problems while generating this password using the Safari web browser. If you’re experiencing similar issues, we suggest trying a different web browser.
Activate and set up the Apple Calendar Synchronization
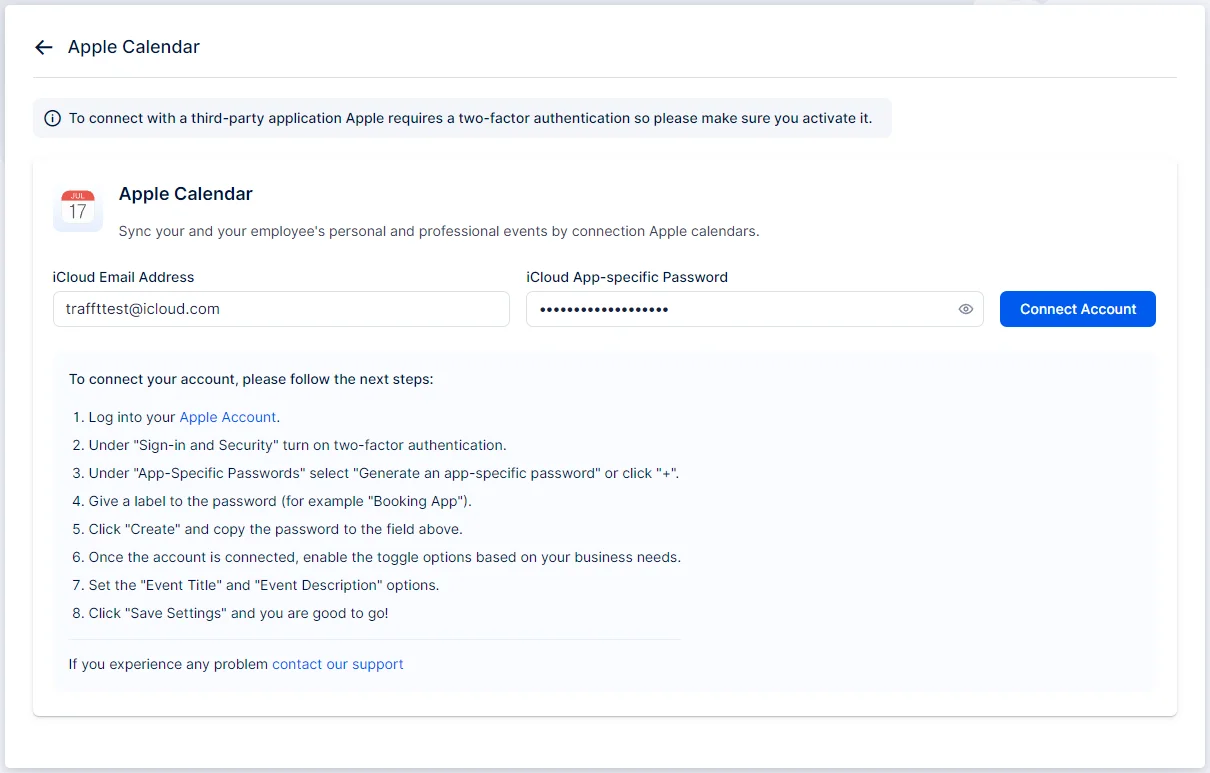
In the separate tab you have open, access Features & Integrations, locate “Apple Calendar” and click “Enable“. Once activated, the card will refresh, showing a “Set Up” button. Click it to access the Apple Calendar configuration page.
Once you access the configuration screen for Apple Calendar, you will simply enter your email address and the App-Specific Password you previously created.
Settings for your Apple Calendar Integration in Quickly Booked App
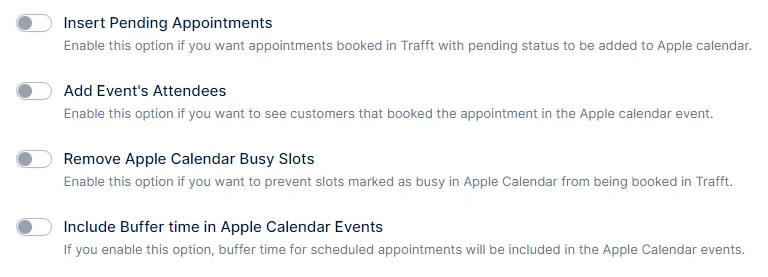
Once you connect your account, below the instructions, you’ll see 4 options:
- Insert Pending Appointments – Enabling this option will create Apple Calendar Events for all appointments with the Pending status (the appointments with the Approved status are automatically added, there’s no way to change this) Add Event’s Attendees – This option is most commonly used for group bookings and it allows you to see all attendees (customers) inside the Apple Calendar Event.
- Remove Apple Calendar Busy Slots – This option allows you to block the time slots that are marked as busy in your Apple Calendar so Quickly Booked App will not be offering those time slots for booking.
- Include Buffer time in Apple Calendar Events – You can choose whether your employees will see only the service duration or they will also see the buffer time before and/or after the appointment so they can know that they should not add another Event in that period.
Click on the toggle next to the option you want to enable.
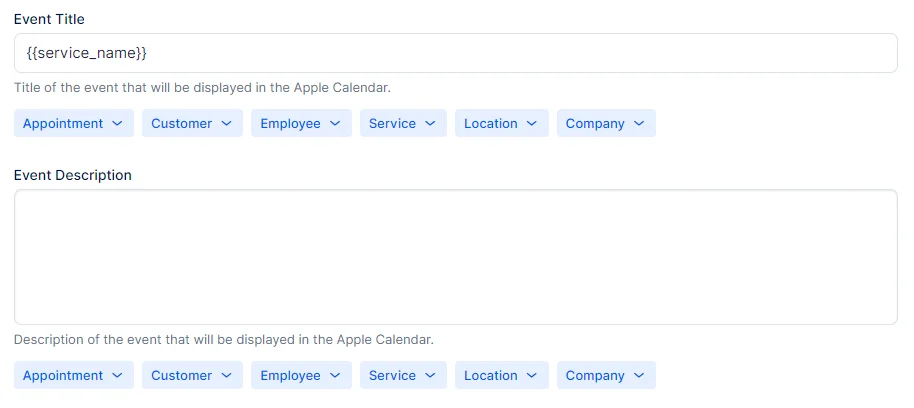
Event Title and Event Description
You have the ability to change the Event Title and Description that are displayed in your Events within the Apple Calendar using these two options. Both fields can be simply set using provided placeholders. Place the cursor inside the field (Title or Description) and then choose from the dropdowns below the field information that you want to see in your Event in the Calendar. By default, only the {{service_name}} placeholder is added to the Title, and the Event Description is blank.
Connecting the Employees
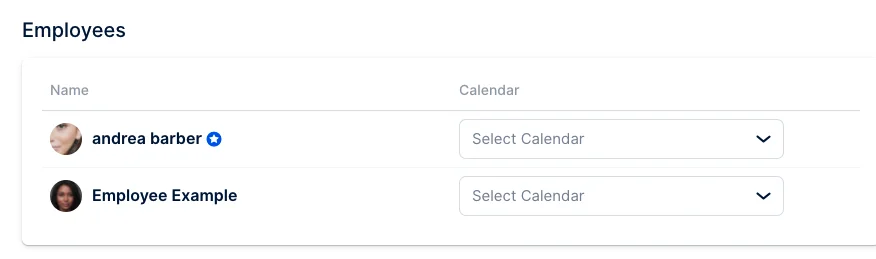
Connect the employee with the desired Apple Calendar
At the bottom of the Apple Calendar settings, you will see the list of your current Employees. You can select one of your calendars connected to the main account (which you have connected with Apple) for each of them, or you can select the same calendar for each employee (can come in handy when they share working space and you want to prevent double bookings).
If you want to allow your employees to log into their personal Apple Calendar, their login needs to be enabled first. You can check out how this is done in detail in the Users and Roles, section, but in short:
- Access the “Settings” section located in the lower left corner of Quickly Booked App's admin page.
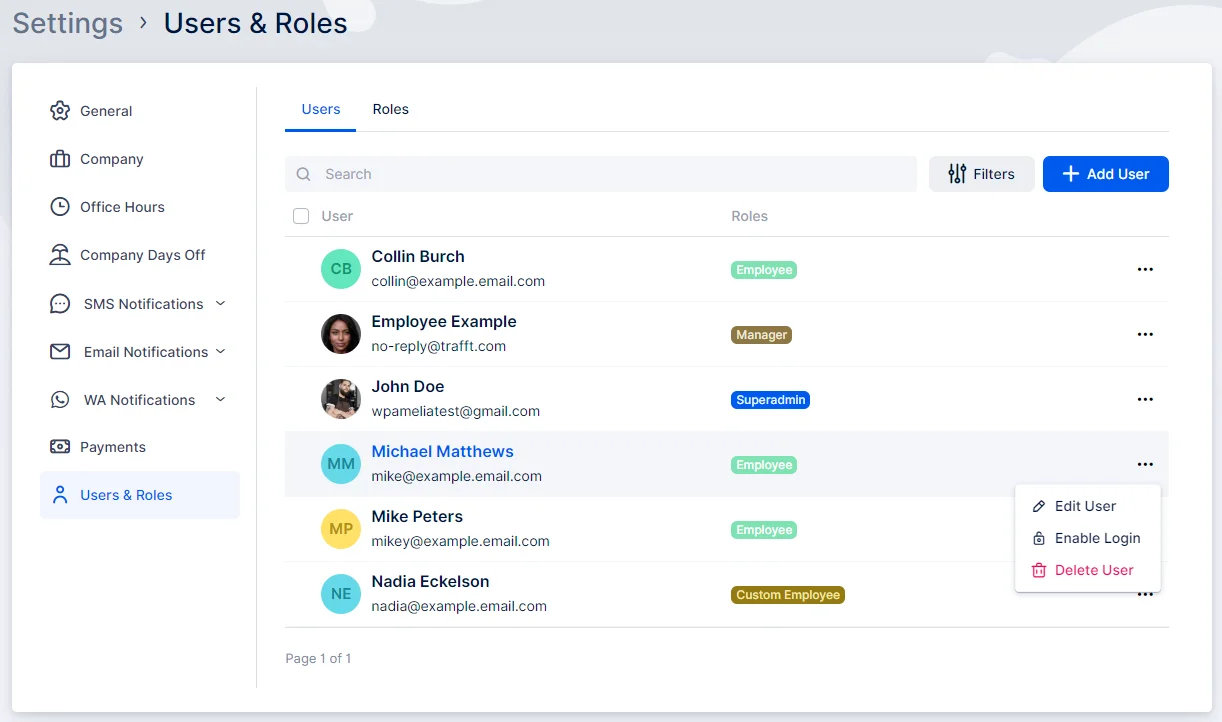
- In the new page that appears, click on “Users and Roles“.
- Next to the employee you want to enable the login for, click on the three-dots menu -> Enable Login:
Then define whether Quickly Booked App will auto-generate a password or if you prefer to create a password manually for this employee. Below that, you can also define whether the employee will be required to choose a new password on the first login or if you’ll only send the login information to the user.
After the employee receives the login information, they can access their Quickly Booked App account. From there, instruct them to navigate to Account Settings to link their Google account with their employee account in Quickly Booked App.
To access the Account Settings, click on the name in the top right corner:
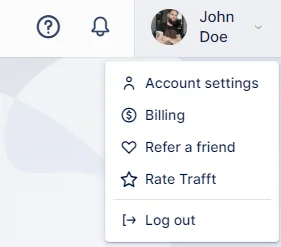
This will open a new window where the logged-in employee can update their personal information, change their password, and manage their schedule (if their user role allows). Most importantly for this integration, they can access the Integrations section and log into their personal Apple account.
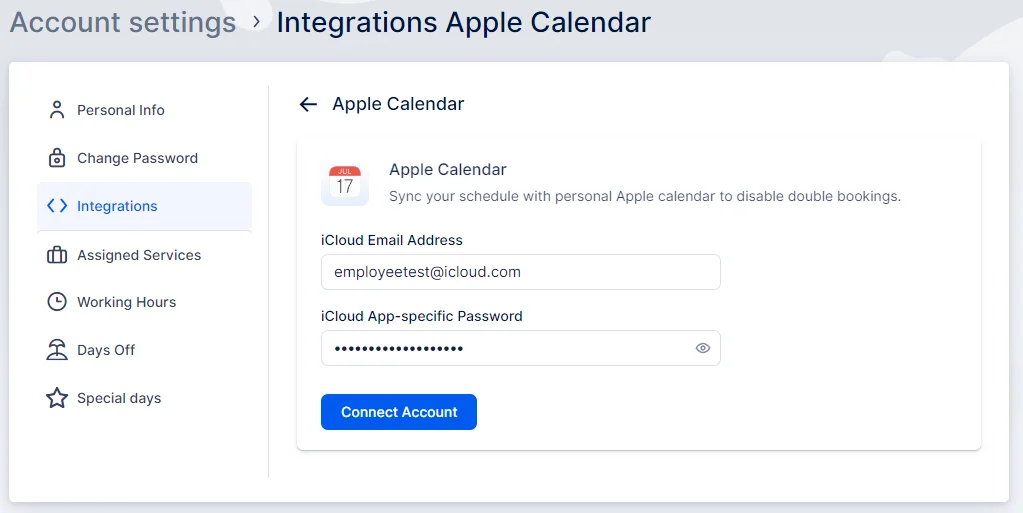
Once the Integration section is accessed, click on “Apple Calendar“.
In there, the employee needs to enter their iCloud Email Address and the iCloud App-specific Password, just like we did at the beginning of this article.
After entering both details, click on “Connect Account” and that’s it.
Can’t see your calendar?
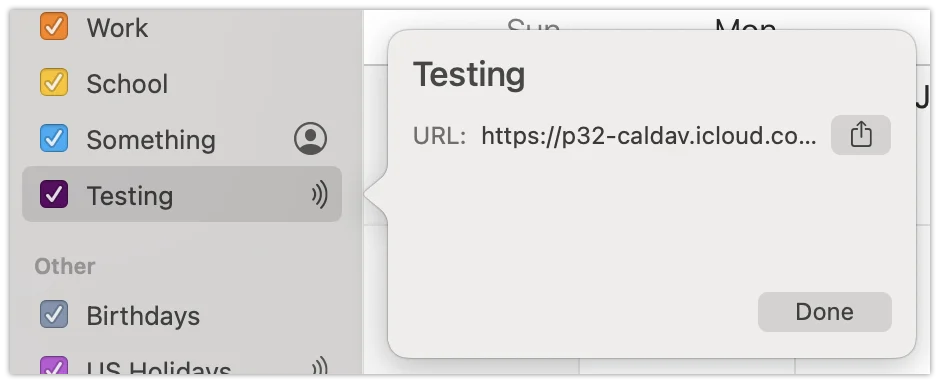
iCloud calendars you subscribe to via URL cannot be connected to Quickly Booked App.
In your Apple Calendar’s left-hand sidebar, a subscribed calendar will display with a darkened icon. If you see a URL when you select this icon, it indicates that you’ve subscribed to a public calendar, and Quickly Booked App won’t be able to establish a connection with it.
Although Quickly Booked App cannot establish connections with subscription calendars, you can link to a private calendar that has been shared with you, provided you have been granted View & Edit permissions for that iCloud calendar. To request View & Edit permissions, please contact the calendar owner. Learn more about sharing iCloud calendars.
Time Zones
Calendar automatically detects your time zone when you create an event, which can be helpful but sometimes leads to confusion.
For instance, imagine you travel from Los Angeles to New York for a business trip. While in New York, you schedule a meeting with your home office in LA for noon on Friday. However, when you return home, you realize the meeting doesn’t show up at noon. This discrepancy is because you initially set the meeting while in the Eastern time zone, so it’s likely listed as 3 p.m. in your calendar. To resolve this, simply adjust the event’s time.
To prevent such issues, access the Calendar dropdown and choose Preferences. In the Advanced tab, ensure that “Time zone support” is activated. With time zone support enabled, when you click on the time frame for an event, you’ll notice a “Time zone” option below the ending time. You can select the time zone where the event will occur or opt for “Floating,” preventing the event from shifting as you change your time zone view. This feature is particularly beneficial for frequent travelers.
The invitation has been declined
By default, Apple doesn’t display events in your calendar if you’ve declined the invitation. To determine if this is causing the issue, access the “View” dropdown menu located at the top of the screen, and choose “Show declined events”.
The calendar is hidden
Frequently, if you can’t locate an event, it’s because you haven’t selected the corresponding calendar for viewing. Locate the calendar’s name in the left-hand sidebar and mark the colored bar next to its name.
If you can’t recall which calendar you assigned to an event, a simple solution is to enable visibility for all your calendars and then identify the event’s highlighting color (or, if you’re in month view, the color of the dot beside the event).
If you haven’t attempted this solution because you remember which calendar the event is in, but it’s still not appearing, try enabling the display of your other calendars as well. It’s possible that you accidentally changed the calendar setting.